
Introduction
Solomon's Knot is an elegant decorative stitch that creates unique arc-shaped decorative effects through the combination technique of extended loops, chain stitches, and single crochet. The characteristic of this stitch is that the stitches present a regular wavy arc pattern, as exquisite as jewelry, hence the name "Seven Treasure Stitch."
The English name for Solomon's Knot is Solomon's Knot, also commonly known as Lover's Knot or Love Knot in international crochet literature. This stitch creates open, elegant mesh structures by controlling loop height and tension, making it a classic technique for lace crochet and decorative edges.
Solomon's Knot is perfect for:
- Shawls and Scarves: The open mesh structure is light and flowing
- Lace Edgings: Adding exquisite decoration to clothing and home items
- Summer Tops: Breathable and comfortable with beautiful drape
- Decorative Borders: Adding romantic flair to blankets, tablecloths, and other projects
Materials Needed
Before practicing Solomon's Knot, prepare the following tools:
- Crochet hook : Recommended 3.5mm or 4.0mm hook for easy loop height control
- Yarn : Choose medium-weight cotton or acrylic yarn in a bright color for easy visibility
- Chain stitch Foundation: Solomon's Knot is worked on a chain foundation
- Single crochet Basics: Solomon's Knot primarily consists of single crochet and chain stitch combinations
Preparation
Before practicing Solomon's Knot, crochet a foundation chain of about 20-25 stitches. This stitch requires some width to showcase its arc effect. Beginners should use thicker yarn and a larger hook to better observe the loop structure.
Step-by-Step Instructions
1Step 1
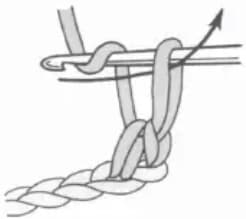
First, crochet 1 turning chain (chain stitch) and 1 single crochet. After completing the single crochet, extend the loop on the hook to an appropriate height. Then yarn over and draw through the loop as shown by the arrow to complete this step. This is the starting point of the Solomon's Knot arc structure. Pay attention to maintaining consistent loop height when extending.
2Step 2
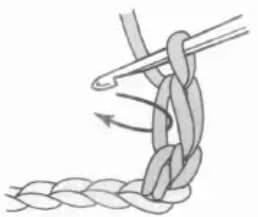
Following the arrow direction, insert the hook into the back bump of the previously crocheted chain stitch. The "back bump" refers to the V-shaped structure on the back of the chain, inserting from top to bottom. After correctly inserting the hook, yarn over and draw through a loop. This step determines the position and tension of the arc.
3Step 3
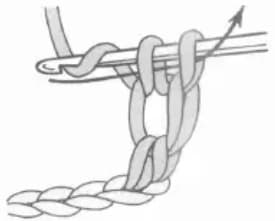
After completing the draw through from the previous step, there are two loops on the hook. Yarn over again and draw through both loops to complete one single crochet. This single crochet secures the position of the arc loop while preparing for the next arc.
4Step 4
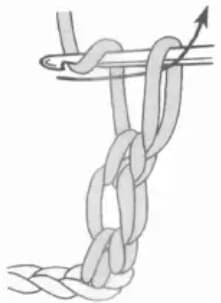
Now begins the key step in forming the arc. Extend the loop on the hook to the same height as the stitch in Step 1-this is an important technique for keeping Solomon's Knot even. Consistent loop height ensures the final arc effect is neat and beautiful. After extending to the appropriate height, yarn over and draw through as shown by the arrow to work a chain stitch. This extended long loop is the source of the signature arc in Solomon's Knot.
5Step 5
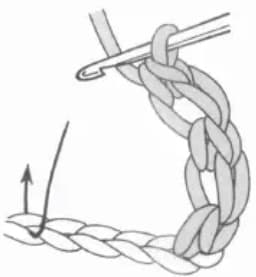
Following the technique from Steps 2 and 3, insert the hook into the back bump of the chain worked in Step 4 and work one single crochet. Then skip 3 foundation chains and insert the hook into the 4th stitch. This skip determines the spacing between arcs and can be adjusted as needed. After inserting the hook, yarn over and draw through a loop.
6Step 6
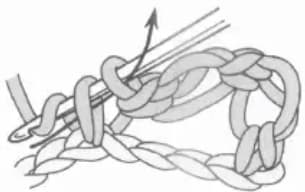
Yarn over and draw through both loops to complete the single crochet. Then extend the loop on the hook and work a chain. Repeat the technique from Steps 2 through 6 to continue crocheting Row 1. After completing each arc unit, check if the loop height is consistent and if the arcs are even. The finished Row 1 should show a regular arc grid pattern.
7Step 7
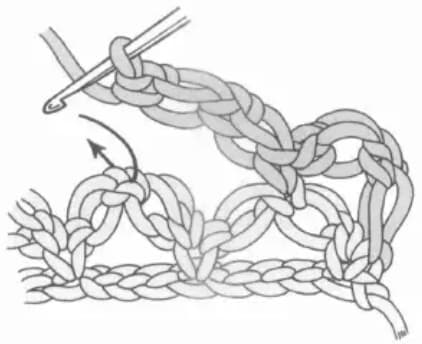
When starting Row 2, first extend the loop on the hook, then work a chain stitch as the turning stitch. This step establishes the starting height of Row 2. Continue crocheting following the technique from Steps 2 through 5, noting to insert the hook in the direction shown by the arrow to work single crochet. The arcs of Row 2 should be staggered with Row 1 to form a mesh structure.
8Step 8
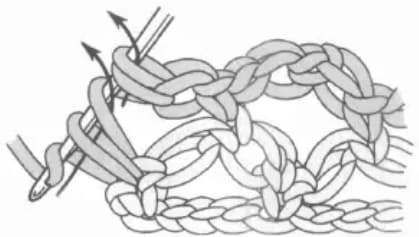
At the end of Row 2, special treatment is needed to finish. Work a single crochet into the loose chain, keeping it incomplete. Then yarn over, insert the hook into the single crochet from the previous row, and draw through. Yarn over again and work two slip stitches as shown by the arrow. This treatment ensures a neat edge and prepares for continuing the work.
9Step 9
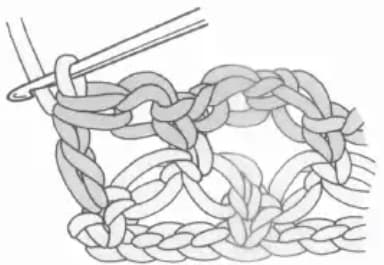
After completing the Row 2 end treatment, the basic unit of Solomon's Knot is mastered. By repeating the techniques from Rows 1 and 2, you can continue crocheting larger pieces. Note that each row's arcs should be even and consistent, and connections between rows should be natural and smooth. With practice, you can control the size and density of the arcs to create different decorative effects.
Tips
Maintain Consistent Loop Height
The beauty of Solomon's Knot depends on the evenness of the arc loops. Each time you extend a loop, you can refer to the height of the previous loop, or use a fixed reference (such as a small ruler) to ensure consistency. Loops that are too tall will make the work loose, while loops that are too short will affect the openwork effect.
Control Tension
Solomon's Knot requires appropriately relaxed tension, especially when extending loops. If tension is too tight, the arcs will become stiff; if too loose, the loop shapes will be difficult to maintain. During practice, find your own tension rhythm and keep each arc's height and firmness consistent.
Choose Appropriate Yarn and Hook
Thicker yarn and larger hooks make it easier to control loop height, suitable for beginners. After becoming proficient, try thinner yarn and smaller hooks for more delicate lace effects. Using cotton or linen yarn provides better line definition and drape.
Common Mistakes
What if arc loop heights are inconsistent?
Inconsistent loop heights are usually due to lack of a reference standard when extending. Solution: Place a small ruler next to your hook or use your finger to fix the height; check if each arc's height matches the previous one after completing it; beginners can practice individual arcs first before combining them into a complete piece.
What if arcs are deformed or twisted?
Arc deformation is usually due to incorrect insertion position or uneven tension. Solution: Ensure you always insert correctly into the "back bump" (back V-shape) of the chain; keep stable during slip stitch, don't pull on the loop; after completing each arc, check if the shape is round, adjusting promptly if there are issues.
What if connections between rows are unnatural?
Unnatural row connections are usually due to not finding the correct insertion position. Solution: When crocheting a new row's arcs, insert the hook at the connection point of the previous row's arcs; ensure consistent skip counts; you can first use stitch markers to mark connection positions, then work without markers after becoming proficient.
Variations and Applications
Solomon's Knot has several variations to choose from:
- Large Arc Solomon's Knot: Extend longer loops for a more open mesh effect
- Small Arc Solomon's Knot: Extend shorter loops for tighter decoration
- Multi-layer Solomon's Knot: Stack multiple layers of loops within arcs for added dimension
- Combined Patterns: Combine Solomon's Knot with other stitches, such as shell stitch or popcorn stitch
Related Stitches
After mastering Solomon's Knot, you can continue learning these stitches:
- : The foundation stitch for Solomon's Knot
- : The key element in forming arcs
- Net Stitch: A similar openwork stitch
- : Technique for joining and securing
Practice Suggestions
Beginners should practice Solomon's Knot following these steps:
- First practice individual arcs using thicker yarn and a larger hook
- Practice controlling loop height to keep it consistent
- Crochet a row of about 10 arc units
- Try crocheting the second row, noting the staggered connection with the first row
- Repeat multiple rows until arcs are even and beautiful
After completing practice, try simple projects: breathable scarves, decorative edgings, or simple Solomon's Knot coasters. These projects help reinforce Solomon's Knot skills while experiencing the satisfaction of decorative stitching.
Solomon's Knot is one of the most elegant decorative stitches in crochet. Once mastered, you can add open, airy decorative effects to various projects. Keep practicing and enjoy the joy of creation!