
Introduction
Single crochet (sc) is the most frequently used basic crochet stitch and one of the best stitches for beginners to learn first. Single crochet creates dense, sturdy fabric that's perfect for items requiring durability, such as coasters, amigurumi, bags, and more.
In US terminology, this stitch is called Single Crochet, abbreviated as sc. In UK terminology, it's called Double Crochet, abbreviated as dc. This terminology difference is common in crochet-when reading English patterns, always check whether they use US or UK terms.
Single crochet is characterized by its short, tightly-packed stitches. One single crochet takes up only one stitch in height, making it relatively quick to work while creating a flat, even surface. Single crochet is also the foundation for learning other stitches-half double crochet, double crochet, and others can be understood as variations of single crochet, just with additional yarn overs and pull-throughs.
In crochet diagrams, single crochet is typically represented by a small X symbol (×). Once you master single crochet, you can create simple squares, pieces with straight edges, and then learn increasing and decreasing techniques to create projects in various shapes.
Materials Needed
Before practicing single crochet, prepare the following tools:
- Crochet hook : Beginners should use a 3.0mm or 3.5mm hook-this size is easy to see and manipulate
- Yarn : Choose medium-weight cotton or acrylic yarn in a bright color to easily see the stitch structure
- Chain stitch foundation: Single crochet is worked on a chain foundation, so please learn chaining first
Practice Preparation
Before practicing single crochet, chain about 15-20 stitches as your foundation chain. This will give you enough length to practice a full row of single crochet.
Step-by-Step Instructions
1Step 1
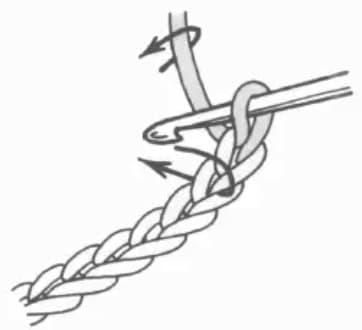
Start with your chain. Skip the first chain stitch closest to your hook (this is your turning chain and doesn't count as a stitch), and insert your hook into the second chain stitch. You can insert under both strands of the V-shape, or just one strand plus the back bump. After inserting, yarn over (yo) to prepare for pulling through.
2Step 2
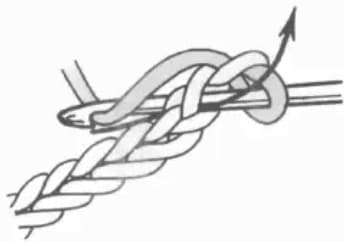
After yarning over, pull the hook with the yarn back through the stitch. You now have two loops on your hook: the original loop and the new loop you just pulled through. Keep both loops on your hook-don't let them slip off.
3Step 3
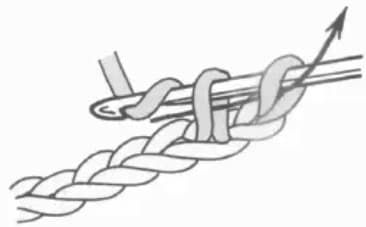
Yarn over again (now you have three loops on your hook momentarily), then pull the hook with the yarn through both loops on your hook at once. This merges the two loops into one, completing one full single crochet stitch. You now have just one loop on your hook, ready for the next stitch.
4Step 4
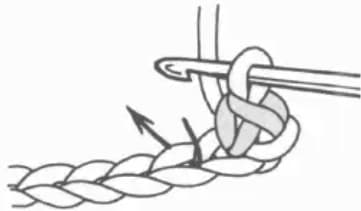
After completing your first single crochet, insert your hook into the next chain stitch (usually the adjacent V-shape). Follow steps 1 through 3 to continue crocheting the second single crochet. Each completed single crochet creates a tight little stitch on your chain foundation.
5Step 5
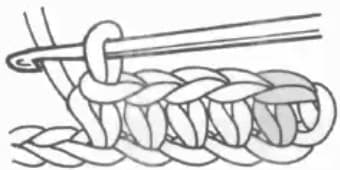
Repeat steps 1 through 3, continuing along the chain foundation until you complete the entire row. Note: The turning chain at the beginning of each row (1 chain stitch) doesn't count as a single crochet stitch-it's just there to match the row height. After completing a row, you'll need to turn your work to crochet the next row.
Tips
Choosing Where to Insert Your Hook
Single crochet can be worked into different parts of a stitch: the back bump only (the raised strand on the back), the back loop only (one strand of the V), or both loops (the entire V-shape). Beginners should start by inserting under both loops-it's easier to work and creates stable stitches. Once you're comfortable, try different insertion points to create different edge effects.
Maintaining Even Tension
Single crochet often suffers from stitches that are too tight or too loose. When practicing, pay attention to: maintaining consistent tension each time you pull through loops; keeping your wrist relaxed, not tense; moving smoothly when inserting your hook into stitches. Even stitches make your work look better and make subsequent rows easier to crochet.
Counting Correctly
When counting single crochet rows, remember: the turning chain at the beginning (1 chain) doesn't count as a stitch; the first row of single crochet starts from the 2nd chain (skipping the 1st as the turning chain), so your first row will have one less single crochet than your foundation chain count. When turning to work the next row, similarly chain 1 first as a turning chain, then start crocheting into the first single crochet of the previous row. Each row should have the same number of single crochet stitches.
Common Mistakes
My single crochet stitches are too tight and hard to work into on the next row. What should I do?
This is the most common problem for beginners. Stitches that are too tight create small spaces, making it difficult to insert your hook on the next row. Solutions: relax your wrist and fingers; loosen slightly each time you pull through to keep loops a bit bigger; slow down deliberately while practicing to focus on tension control. Try practicing with a slightly larger hook first to build proper muscle memory, then switch back to the standard hook.
My stitch count varies each row-sometimes more, sometimes less. How do I fix this?
Stitch count changes usually come from skipping stitches or working into the same stitch twice. Solutions: count your stitches after each row; use stitch markers to mark the first and last stitches of each row; when turning your work, confirm the position of the first stitch (right next to the turning chain). Get in the habit of counting each row to prevent your work from distorting.
The edges of my single crochet work are uneven. What's causing this?
Uneven edges usually come from improper handling at the beginning or end of rows. Beginning-of-row issues: forgetting the turning chain, or making the turning chain the wrong height. End-of-row issues: skipping the last stitch, or accidentally working into the turning chain. Solutions: always chain 1 for the turning chain at the start of each row; confirm the position of the last stitch at the end of each row (it should be in the last stitch of the previous row); use stitch markers to mark the edge stitches.
Related Stitches
After mastering single crochet, you can continue learning these stitches:
- : The foundation for single crochet, essential for starting any project
- : Slightly taller than single crochet, with one additional yarn over
- Single Crochet Increase (2 sc in 1 stitch): Work 2 single crochet stitches into the same stitch to increase stitch count
- Single Crochet Decrease (sc2tog): Combine two adjacent stitches into one to decrease stitch count
Practice Suggestions
Beginners should practice working complete rows of single crochet repeatedly until they can do it smoothly. Practice steps:
- Chain about 20 stitches as your foundation
- Work one row of single crochet into the chain
- Turn your work and crochet the second row of single crochet
- Repeat practice until each row has consistent stitch count and even stitches
After completing your practice, try simple projects: small coasters, square motifs, or simple straight scarves. These projects help reinforce your single crochet skills while building a sense of accomplishment.
Single crochet is the core skill of crochet-once you master it, you can create countless wonderful projects. Keep practicing and enjoy the joy of creating!