
Introduction
Slip stitch (sl st) is the shortest stitch in crochet. Its key characteristic is that it does not add height to your work. It's primarily used for joining, edging, moving position, and finishing. In English, it's called Slip Stitch, abbreviated as sl st.
The slip stitch plays an essential role in crochet - almost every project uses it. Its main purposes include:
- Joining: Connecting the first and last stitches when working in the round to form a closed circle
- Edging: Creating flat, neat edges on blankets, scarves, and other projects
- Repositioning: Moving across the work to a new position without adding height
- Finishing: Securing the final stitch when completing a project
Unlike other stitches, the slip stitch doesn't create a new "stitch" on your work. It simply passes the loop on your hook through the target stitch, so slip stitches produce almost no visible fabric height.
Materials Needed
Before practicing the slip stitch, you'll need the following:
- Crochet hook: Use the same hook size as your current project
- Yarn: Use the yarn already in your project
- Existing chain or fabric: Slip stitches are worked into existing stitches
Practice Tip
Beginners can start by crocheting a few as a practice foundation, then practice slip stitches along the chain.
Step-by-Step Instructions
1Step 1
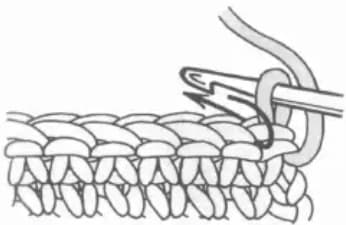
Insert the hook into the specified stitch or position. Usually, insert from the front of the stitch (under both V-shaped strands), ensuring the hook goes through from directly below the stitch.
2Step 2
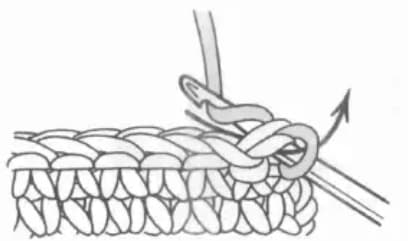
Yarn over the hook, then use the hook to draw the yarn back through the target position. At this point, there are two loops on your hook: the original loop and the newly drawn loop.
3Step 3
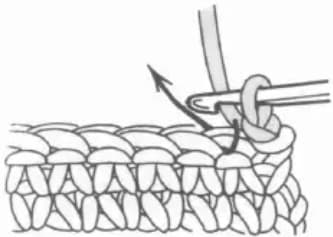
Pull the newly drawn loop directly through the original loop on the hook, completing the slip stitch in one motion. This is the core movement of the slip stitch - unlike other stitches, it doesn't require multiple steps.
4Step 4
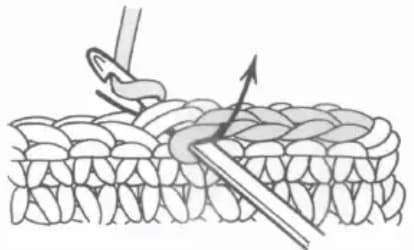
After completing the slip stitch, only one loop remains on the hook. You can see that the join is flat and compact, adding almost no height to the fabric.
Common Uses
1. Joining Rounds
When working in the round, after completing a round, use a slip stitch to join the first and last stitches, forming a closed circle. The join is typically made at the top of the first stitch.
2. Edging
Working slip stitches around the edge of a project creates a flat, neat, and tidy border. This technique is commonly used for blankets, scarves, and other finished pieces.
3. Repositioning
When you need to move across the work without adding height, use consecutive slip stitches to travel to a new position. For example, when crocheting motifs, you might need to move to a specific spot to begin a new pattern.
4. Finishing
After completing the final stitch of a project, use a slip stitch to secure it, then cut the yarn and pull through the loop to fasten off.
Tips & Tricks
Control Your Tension
Tension is important when making slip stitches. Too tight makes subsequent insertions difficult; too loose affects the neatness of the join. Maintain moderate tension to keep slip stitches consistent with your other stitches.
Correct Insertion Position
Find the right spot when inserting the hook. Usually, insert directly below both V-shaped strands at the top of the stitch - not from the side or at an incorrect position, which would affect the slip stitch result.
Round Joining Tip
When joining rounds, use a stitch marker to identify the first stitch, ensuring you join to the correct position each round. Insert the hook through both strands at the top of the first stitch, not just one strand.
Common Mistakes
What if my slip stitches are too tight?
Slip stitches that are too tight are the most common problem, making it difficult to insert the hook in subsequent rows. Solution: Relax your hand tension and loosen each slip stitch slightly; you can also try using a hook one size larger specifically for slip stitches.
What if I can't find the joining position when working in rounds?
Not being able to find the join position is usually because the first stitch wasn't marked. Mark the first stitch at the beginning of each round so you can find the position accurately when joining. You can also look for the V-shaped structure - the top of the first stitch has two distinct V-shaped strands.
What if my work looks slanted after slip stitches?
Slanted work may result from incorrect joining position or uneven tension. Solution: Make sure each round joins at the top of the first stitch (both strands), not at the side or below; keep tension consistent for each slip stitch.
Do slip stitches count as stitches?
Correct - slip stitches do not add to your stitch count. They are purely connecting or repositioning moves. After completing a slip stitch, no new stitch is created in your work. Therefore, when counting stitches, slip stitches are typically not included in the total count.
Related Stitches
After mastering the slip stitch, you can continue learning these basic stitches:
- : The starting point for all crochet projects, used together with slip stitches
- : The most commonly used basic stitch, the foundation for working on chains
- : A popular starting method for circular projects, requires slip stitch to join
Practice Suggestions
Beginners should practice slip stitches using these steps:
- First, crochet a chain of 10-15 stitches as a practice foundation
- Practice slip stitches along the chain, one by one, to get a feel for the insertion, yarn over, and pull-through motion
- Try working consecutive slip stitches along the chain and observe the effect
- Practice joining rounds: crochet several chains, then use a slip stitch to join the first and last chains to form a ring
The slip stitch may be simple, but it's an essential technique in crochet. Master it, and your projects will be more complete and professional!