
Introduction
Single Crochet Back Post is a special relief stitch (Relief Stitch) that creates a recessed relief texture effect by working around the post from behind the fabric. Unlike regular single crochet, the back post stitch has a unique insertion method that produces a three-dimensional visual layering.
Back post stitches are commonly called Back Post Single Crochet (BPSsc) in relief texture crocheting. This technique works around the post of the previous row rather than through the top loops, causing the stitch to "sink" into the fabric surface, creating a unique groove effect.
Back post stitches are commonly used for:
- Creating three-dimensional texture patterns, such as basket weave texture, brick wall texture
- Making decorative groove lines
- Combining with front post stitches to create raised and recessed contrast relief patterns
- Edge decoration, adding layers to the work
Tools Needed
Before practicing single crochet back post, you need to prepare:
- Crochet hook : Recommended 3.0mm to 4.0mm hook, easier to maneuver around the post
- Yarn : Medium-weight cotton or acrylic yarn, easier to observe stitch structure
- basics: Need to master regular single crochet first
- Base fabric: Recommended to crochet several rows of single crochet as a practice base
Practice Preparation
Before practicing back post stitches, please crochet at least 3-4 rows of single crochet as a base fabric. Back post stitches need to work around the posts of the previous row, having a fabric with enough height makes it easier to observe and practice.
Step-by-Step Instructions
1Step 1
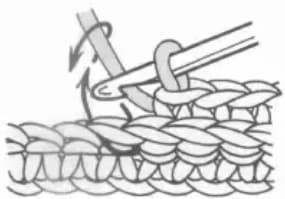
The key to back post stitches lies in the insertion position. Unlike regular single crochet which inserts from the front, back post stitches require the hook to be inserted horizontally from the back of the fabric, going around the single crochet post of the previous row. Specifically: insert the hook from behind the post on the right side (if right-handed), pass horizontally through, and come out from behind the post on the left side, creating a "hugging" position around the post. Then yarn over on the hook, preparing to pull through.
2Step 2
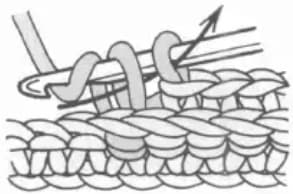
After yarning over, pull the hook with the yarn through from behind the post. At this point there are two loops on the hook. Yarn over again and pull through both loops at once, completing one full back post single crochet. Note that this step is completed the same way as regular single crochet, only the insertion position is different.
3Step 3
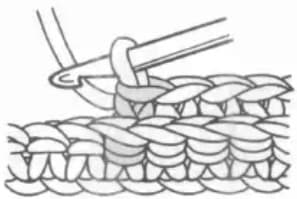
After completion, you can see that the back post stitch presents a recessed relief effect, "sinking" into the fabric surface. Conversely, if using front post stitches (working around the post from the front), the stitch will protrude from the surface. By combining front post and back post stitches, you can create rich three-dimensional texture patterns.
Tips
Choosing Insertion Direction
Back post stitches can be inserted from two directions: from right to left around the post (when right-handed), or from left to right. Which direction to choose depends on your desired effect and pattern requirements. Usually inserting from right to left is more suitable for right-handed crocheters and flows more smoothly.
Keeping Fabric Flat
Back post stitches cause a certain amount of fabric contraction. To keep the fabric flat, it's recommended to pair back post stitches with regular single crochet on both sides, or alternate rows of back post stitches with regular single crochet rows. This balances the fabric tension and avoids excessive contraction.
Combining with Front Post Stitches
Back post stitches are most commonly combined with front post stitches to create raised and recessed contrast relief effects. For example: alternating front post and back post stitches to create wave textures; or crocheting checkerboard combinations of front and back post stitches to create grid textures. This technique is often used for baskets, cushion covers, and other projects requiring three-dimensional effects.
Common Mistakes
What if the hook has difficulty going around the post when inserting?
This may be because the single crochet in the previous row was crocheted too tightly. Solution: Maintain appropriate tension when crocheting the base rows; relax your tension slightly during practice; if already crocheted too tightly, try using a slightly larger hook to help, or gently squeeze the fabric to create more space.
What if the fabric becomes uneven after back post stitches?
Back post stitches change the fabric's tension distribution. Solution: Crochet regular single crochet rows before and after back post stitch rows to balance tension; maintain consistent tension between back post stitches and regular single crochet; add regular single crochet at edges to stabilize shape.
What if the raised/recessed effect of back post stitches is not obvious?
The effect of back post stitches is influenced by yarn and hook. Using thicker yarn and a slightly smaller hook can enhance the relief effect; ensure correct insertion position, actually going around the entire post rather than just picking up part of it; using stiffer cotton yarn produces more obvious effects than soft acrylic yarn.
Related Stitches
After mastering single crochet back post, you can continue learning these stitches:
- : The foundation stitch for back post stitches
- Double Crochet Back Post: Uses the same technique but with an additional yarn over, creating a higher relief effect
- Half Double Crochet Back Post: Relief effect between single crochet and double crochet
- Front Post Stitch: Works around the post from the front, creating a raised relief effect, used in combination with back post stitches
Practice Suggestions
Recommended steps for practicing single crochet back post:
- First crochet a swatch about 15 stitches wide and 4-5 rows high of single crochet
- In a new row, try crocheting back post stitches, paying attention to insertion position
- After completing 3-4 stitches, observe the recessed effect
- Continue practicing entire rows of back post stitches, keeping stitches even
- Try alternating regular single crochet and back post stitches to experience the texture contrast
Once proficient, try designing simple relief patterns like straight lines, grids, waves, etc., to create unique three-dimensional texture works.
Single crochet back post is an important technique for creating three-dimensional textures. Combined with front post stitches, you can design rich and colorful relief patterns. Keep practicing and explore more possibilities!