
Introduction
Y Stitch is a decorative stitch that combines Treble crochet with Double crochet to form a Y-shaped fork. This stitch creates unique Y-shaped textures on the fabric surface, commonly used for creating lace, decorative edges, and pattern designs.
The Y stitch is characterized by branching a double crochet from the middle of a treble crochet, resembling the letter "Y", hence its name. This stitch can create elegant decorative effects, especially suitable for:
- Lace design: Creating delicate edge decorations
- Pattern textures: Forming unique geometric patterns on fabric
- Decorative edges: Adding elegant branching effects to your work
- Creative crochet: Combining with other stitches to create complex patterns
Tools Needed
Before practicing the Y stitch, prepare the following tools:
- Crochet hook: Recommended 3.0mm or 3.5mm hook
- Yarn: Choose medium-weight cotton or wool yarn in a bright color for easy stitch visibility
- Scissors: For cutting yarn
- Stitch markers: Optional, for marking Y stitch positions
Practice Tips
Beginners should first master the basic treble crochet and double crochet techniques before attempting the Y stitch. This stitch requires changing the insertion point mid-work, requiring certain dexterity.
Step-by-Step Instructions
1Step 1
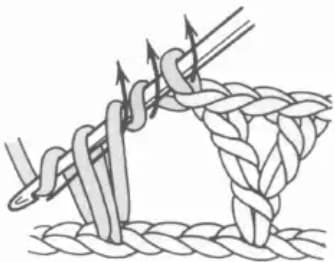
Wrap yarn twice around the hook, insert into the 4th chain from hook, and work a treble crochet. This is the main starting part of the Y stitch, the treble crochet will serve as the stem of the Y.
2Step 2
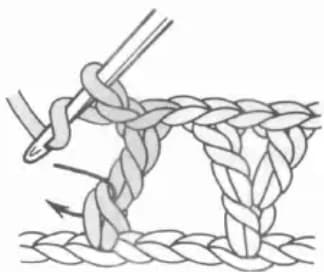
Work 1 chain stitch, then yarn over, insert the hook as shown by the arrow, yarn over and pull through. Note that the insertion point is in the middle of the treble crochet - this is key to forming the Y fork.
3Step 3
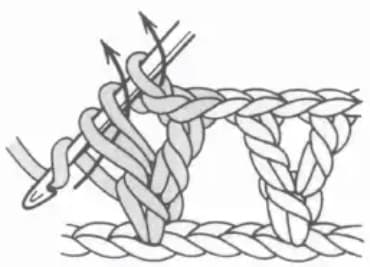
Yarn over, pull through two loops at a time as shown by the arrow, twice total, to complete a double crochet. This double crochet branches out from the middle of the treble crochet, forming one branch of the Y.
4Step 4
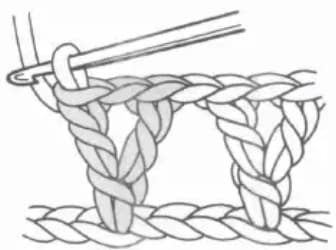
The Y stitch is complete. Since the Y stitch creates an increase effect, you need to skip stitches from the previous row to adjust the stitch count. You can see the overall Y shape, with the treble crochet as the main stem on one side and the branched double crochet on the other.
Stitch Count Notes
Stitch count rules for the Y stitch:
| Position | Effect After Completion | Stitches Used | |---------|------------------------|---------------| | Treble crochet starting position | Forms Y-shaped fork | Uses 1 stitch position but produces 2 top loops |
Counting Key: The Y stitch starts from one stitch but creates two loops at the top after completion, so extra handling of one loop is needed when working the next row.
Tips
Find the Right Branching Position
The insertion point for the branching double crochet is crucial, usually at the middle to slightly upper part of the treble crochet. If positioned too low, the Y shape won't be obvious; if too high, the branch will be unstable.
Maintain Even Loop Tension
When working the branching double crochet, keep the loop tension consistent with the treble crochet so that both branches of the Y are coordinated and attractive.
Purpose of the Chain
The middle chain serves as a connection and transition, helping the branch look more natural. Do not skip or alter this chain stitch.
Count Adjustment
Since the Y stitch creates extra loops, be mindful of count adjustment when working a full row. You can balance the stitch count by skipping corresponding stitches from the previous row.
Common Mistakes
What if the Y shape is not obvious?
The Y shape being unclear is usually caused by the branching position being too low or too high. Solution: Find the right insertion point in the middle of the treble crochet, typically at 1/2 to 2/3 of the treble crochet height for best results.
What if the branching double crochet is crooked?
Crooked branching is usually caused by incorrect insertion angle or uneven yarn pulling. Solution: Keep the hook perpendicular when inserting, maintain even tension when pulling through, and ensure both sides have consistent tension.
What if the next row stitch count doesn't match?
The Y stitch creates two loops at the top, which need adjustment when working the next row. Solution: You can skip adjacent stitches, or treat the Y stitch as two stitches when working the next row.
What if the chain is too tight or too loose?
The tension of the chain affects the Y shape. Solution: Keep the chain tension consistent with the overall work - don't pull too tight to distort the Y, and don't make it too loose to cause the branch to droop.
Variations
After mastering the basic Y stitch, try these variations:
- Different height Y stitches: Use half double crochet or taller stitches as the main stitch
- Multi-branch Y stitches: Branch multiple times from the main stitch
- Reverse Y stitch: Change the branching direction to create symmetrical patterns
- Combined Y stitches: Work consecutive Y stitches to form decorative edges
Related Stitches
After mastering the Y stitch, you can continue learning these related stitches:
- : The main stitch of the Y stitch
- : The branching stitch of the Y stitch
- : The connecting stitch in the Y stitch
Practice Suggestions
Recommended practice steps for learners:
- Basic practice: First master treble crochet and double crochet separately
- Positioning practice: Practice finding the correct branching position in the middle of a treble crochet
- Single practice: Practice completing one full Y stitch
- Continuous practice: Try working multiple Y stitches consecutively
- Project application: Apply Y stitches to lace or decorative patterns
Once you can proficiently complete the Y stitch, you'll be able to create unique Y-shaped decorative effects!
The Y stitch is an important technique for creating branching decorative effects in crochet. Master it to add elegant texture and variation to your work!