
Introduction
Ridge stitch is a variation of single crochet characterized by working into only one loop of the stitch (back loop or front loop) instead of both loops as in regular single crochet. This technique creates unique textured ridges, giving the fabric a three-dimensional striped texture.
In US terminology, this stitch is called Single Crochet in Back Loop Only (sc blo) or Single Crochet in Front Loop Only (sc flo), depending on whether you work into the back loop or front loop. This technique is commonly used to create textured edges, decorative striped patterns, and projects that need stretch and elasticity.
The core principle of ridge stitch: regular single crochet works into both loops of the V-shaped stitch, while ridge stitch works into only one loop, leaving the other loop free. This creates a distinct ridge line, producing a raised textured effect.
Materials Needed
Before practicing ridge stitch, prepare the following:
- Crochet hook : Recommended 3.0mm or 3.5mm hook
- Yarn : Medium-weight cotton or acrylic yarn
- foundation: Ridge stitch is a variation of single crochet, please master single crochet first
Practice Preparation
Before practicing ridge stitch, crochet several rows of regular single crochet as a foundation. This makes it easier to see and pick up single loops.
Step-by-Step Instructions
1Step 1
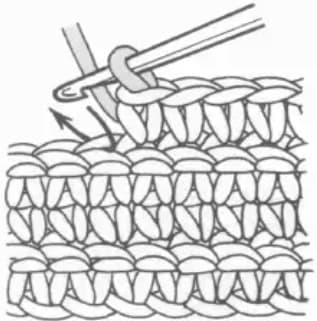
Work each row alternating from front and back. Observe the structure of single crochet stitches from the previous row-each stitch has a V-shape made of front and back loops. Insert your hook into one loop of the stitch from the previous row (usually the back loop), picking up only this one strand, not the entire stitch.
2Step 2
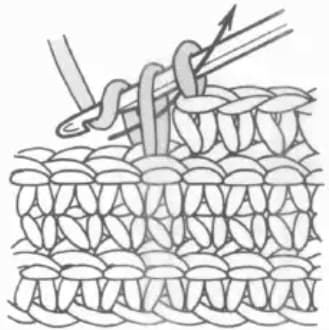
Yarn over and pull through. You now have two loops on your hook. Yarn over again and pull through both loops at once to complete one ridge stitch. Unlike regular single crochet, since only one loop was picked up, the free loop creates a distinct ridge, giving the fabric a unique textured effect.
Tips
Choosing Which Loop to Work Into
Ridge stitch can be worked into the front loop (front loop only - flo) or back loop (back loop only - blo). Working into the back loop (blo) creates an outward-projecting ridge effect, which is the most common approach. Working into the front loop (flo) creates an inward-recessed effect, suitable for projects requiring different texture variations.
Maintaining Consistent Texture
For neat ridge effects, maintain consistent loop selection throughout your project. If you choose back loop, always work into back loop; if front loop, always front loop. Mixing them will result in uneven texture.
Elasticity of Ridge Stitch
Projects made with ridge stitch are usually more elastic than regular single crochet projects. Because one loop remains free, the fabric has better stretch. This makes ridge stitch perfect for projects requiring stretchy fit, such as hat brims and cuffs.
Common Mistakes
I picked the wrong loop and the texture is uneven. What should I do?
This is a common problem for beginners. Solutions: Before crocheting, carefully observe each stitch structure to confirm the two loops of the V-shape; choose a habitual loop direction (beginners should try back loop first); use stitch markers to mark the first stitch of each row to maintain consistent direction; slow down to ensure correct placement every time.
Sometimes I accidentally picked up the whole stitch. What should I do?
This happens due to habitual motion. Solutions: Pause before each stitch to confirm picking up only one loop; practice saying "just one loop" silently to remind yourself; if you notice a mistake, undo and redo until you build correct muscle memory.
The ridge effect is not obvious. What should I do?
The ridge effect may not be obvious if yarn is too thin or hook is too large. Solutions: Try using a slightly smaller hook to increase fabric density; choose yarn with some elasticity; ensure each row works into the same loop (always back loop or always front loop); practice with contrasting color yarn to see texture more easily.
Applications
Ridge stitch is suitable for these projects:
- Hat brims: Using the elasticity of ridge stitch for a fitted hat edge
- Cuffs and necklines: Edges that need stretch and elasticity
- Decorative stripes: Adding subtle texture variations to solid-color projects
- Toys and amigurumi: Creating tactile surface textures
- Bag edges: Adding durability and aesthetics
Related Stitches
After mastering ridge stitch, continue learning these related stitches:
- : The foundation stitch for ridge stitch
- : Another variation stitch that creates texture
- : Used with front post stitch to create 3D patterns
- Half double crochet ridge stitch: A variation of half double crochet, also working into only one loop
Practice Suggestions
Beginners should practice ridge stitch in these steps:
- First chain 10-15 stitches as a foundation
- Crochet 2-3 rows of regular single crochet to familiarize yourself with stitch structure
- Start practicing ridge stitch working into back loops
- Continue for 5-10 rows and observe the ridge effect
- Try working into front loops to compare the difference
After completing practice, try simple projects: textured coasters, stretchy hair ties, or simple ridge-stitch scarves. These projects help reinforce ridge stitch skills while experiencing the unique texture it creates.
Ridge stitch is a simple yet effective variation technique in crochet. Master it and your projects will have richer texture variations. Keep practicing and enjoy the joy of creating!