
Introduction
The Reverse Y Stitch (Double Crochet) is a variation stitch and the reverse version of the Y stitch. This stitch creates a reverse fork effect on a double crochet foundation through special yarn wrapping and insertion methods, producing unique decorative pattern textures.
The difference between the reverse Y stitch and the Y stitch lies in the direction of the fork: the Y stitch's fork extends upward, while the reverse Y stitch's fork extends downward. This reverse fork effect adds unique visual layers to your fabric and is commonly used in decorative edging, openwork patterns, and special texture designs.
In pattern diagrams, the reverse Y stitch is typically represented by an inverted Y-shaped symbol, clearly showing its reverse fork characteristic. Once you master the reverse Y stitch, you can use it in combination with the Y stitch to create richer and more diverse pattern combinations.
Required Tools
Before practicing the reverse Y stitch, you will need the following tools:
- Crochet hook : A 3.5mm or 4.0mm hook is recommended for easier manipulation of multiple yarn overs
- Yarn : Choose medium-weight cotton or acrylic yarn in a bright color for easy stitch identification
- foundation: The reverse Y stitch is a variation of double crochet, so please master the double crochet method first
Practice Preparation
Before practicing the reverse Y stitch, it's recommended to crochet a few rows of chain stitches and regular double crochet as a foundation. Since the reverse Y stitch involves multiple yarn overs and pull-throughs, maintain moderate tension to avoid loops that are too tight and difficult to work with.
Step-by-Step Instructions
1Step 1
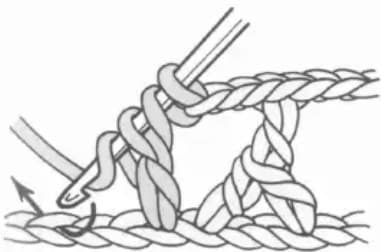
At the starting position, wrap the yarn twice around the hook (double wrap) to form two loops. Then insert the hook into the chain stitch and yarn over to pull through. At this point, there are multiple loops on the hook. Yarn over and pull through the two loops closest to the hook. Then yarn over again, insert the hook at the indicated position as shown by the arrow, yarn over, and pull through.
2Step 2
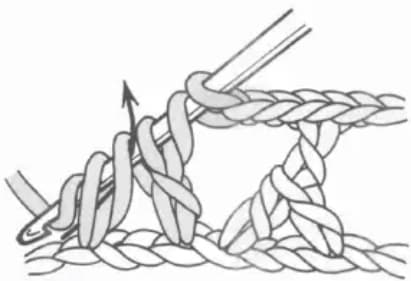
Yarn over and pull through two loops on the hook as shown by the arrow. This step begins forming the foundation structure of the reverse fork. Maintain even pulling tension to avoid loops that are too tight or too loose.
3Step 3
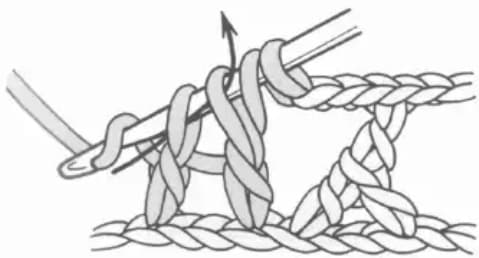
Yarn over on the hook and continue pulling through two loops on the hook as shown by the arrow. This step continues the previous operation, gradually completing the reverse fork formation process.
4Step 4
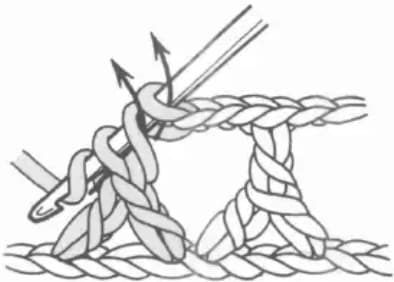
Yarn over on the hook and pull through two loops at a time, doing this twice in total. After completing these steps, the reverse Y stitch is finished, and you can see a clear reverse fork effect.
Tips
Controlling Yarn Over Count
The reverse Y stitch begins by wrapping the yarn twice around the hook. Ensure both wraps have consistent tension. Wrapping too tightly will make subsequent pull-throughs difficult, while wrapping too loosely will affect stitch neatness. Practice the feel of double wrapping separately before starting.
Accurate Hook Insertion
The insertion point for the reverse Y stitch is more complex than regular double crochet. Find the insertion point accurately according to the diagram. Incorrect insertion will affect the reverse fork formation. Use the hook tip to gently probe and confirm the position before officially inserting.
Using with Y Stitch
The reverse Y stitch works best when combined with the Y stitch to create up-and-down alternating fork patterns. Try alternating between the two stitches every other row, or alternate within the same row for richer decorative effects.
Maintaining Consistent Stitch Height
Due to the many steps in the reverse Y stitch, it's easy to have inconsistent stitch heights. Maintain a steady rhythm while crocheting, check the loop count after each pull-through, and ensure stitch height matches surrounding double crochet stitches.
Common Mistakes
What if the yarn over count is wrong and the finished effect is incorrect?
The reverse Y stitch requires wrapping the yarn twice around the hook first, which is the foundation for forming the reverse fork. If you forget to wrap twice or only wrap once, the stitch effect will be incorrect. Solution: Before starting each reverse Y stitch, confirm there are two complete yarn over loops on the hook, and develop the habit of counting loops.
What if loops slip off or are difficult to pull through?
Loops slipping off is usually caused by wrapping too tightly or incorrect hook angle. Solution: Maintain moderate tension when wrapping; loops should be large enough but not loose. When pulling through, lift the hook tip slightly to help loops slide more easily. Check if the yarn has knots or rough spots affecting movement.
What if the reverse fork effect is not obvious?
An unobvious reverse fork effect may be caused by incorrect insertion position or skipped pull-through steps. Solution: Carefully compare with the diagram to confirm the insertion position is correct. Ensure all pull-through steps are completed without skipping any in between. Check that each pull-through goes through the correct loops.
What if stitches around the reverse Y stitch become deformed?
Deformation of surrounding stitches is usually caused by significant tension changes in the reverse Y stitch area. Solution: Use slightly looser tension on both sides of the reverse Y stitch to balance. Avoid using the reverse Y stitch at fabric edges, keeping a few regular stitches as borders. You can use single crochet in rows above and below the reverse Y stitch row to stabilize the overall structure.
Related Stitches
After mastering the reverse Y stitch, you can continue learning these related stitches:
- : The foundation stitch for the reverse Y stitch
- Y Stitch: The forward fork version, can be combined with reverse Y stitch to create rich patterns
- variations: Other variation stitches based on half double crochet
- Cross Stitch: Another variation stitch that creates special textures
- Puff Stitch: Three-dimensional patterns formed by multiple stitches joined into one
Practice Suggestions
Follow these steps to practice the reverse Y stitch:
- First practice the insertion position and yarn wrapping technique on a chain stitch foundation
- Practice the complete process of a single reverse Y stitch
- Try crocheting several reverse Y stitches continuously, maintaining even spacing
- Practice alternating with regular double crochet, feeling the texture changes
- Try combining with Y stitch to create decorative edging with up-and-down forks
After completing basic practice, try crocheting some decorative edging projects like reverse fork border blankets, combined texture scarves, and decorative collars. These projects will help consolidate your reverse Y stitch skills while experiencing the creative joy of variation stitches.
The reverse Y stitch is a variation stitch in crochet that creates unique fork effects. Mastering it will add reverse-extending decorative textures to your work. Keep practicing and explore more wonderful pattern combinations!