
Introduction
Reverse Single Crochet is a unique crochet technique where you work single crochet stitches backwards from left to right (or right to left, depending on your handedness), creating a distinctive twisted edge effect. This stitch is called Crab Stitch or Reverse Single Crochet in English, named because the working direction is opposite to regular single crochet, similar to how a crab walks sideways.
Reverse single crochet is most commonly used for edge decoration on finished pieces:
- Add a refined border to blankets, scarves, coasters, and other projects
- Create unique twisted texture, adding elegance to your work
- Serve as a finishing stitch, making edges neat and attractive
- Combine with other border stitches for rich decorative effects
Materials Needed
Before practicing reverse single crochet, you'll need:
- Crochet hook : Recommended to use the same size or slightly larger hook than used for your project
- Yarn : The same yarn as your project
- foundation: Need to be comfortable with regular single crochet first
- Completed fabric: Need a finished edge to work on
Practice Preparation
Reverse single crochet is typically worked on the edge of a finished piece. We recommend first completing a single crochet swatch (about 20 stitches wide, 10 rows high), then practice reverse single crochet along the edges.
Step-by-Step Instructions
1Step 1
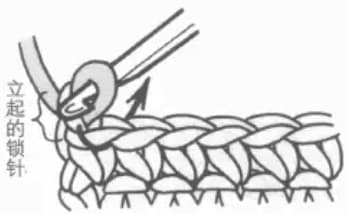
The unique aspect of reverse single crochet is the working direction. Regular single crochet is worked from right to left, while reverse single crochet is the opposite. First, position your work along the edge direction. At the starting point (left edge for right-handed crocheters), chain 1 as a turning chain. Then, following the arrow, insert your hook from right to left in the reverse direction-completely opposite to regular single crochet.
2Step 2
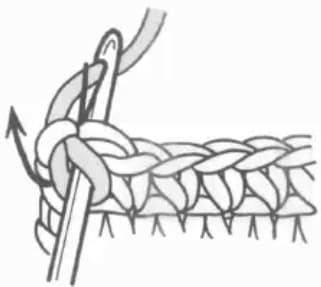
After inserting, position your hook over the working yarn, yarn over, and pull through. You now have two loops on your hook, the same as regular single crochet. Maintain appropriate tension-too tight will make subsequent stitches difficult, too loose will affect the finished appearance.
3Step 3
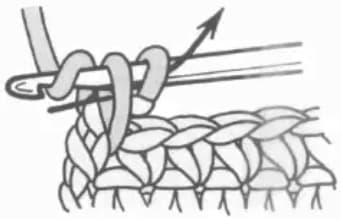
Yarn over again on your hook, and following the arrow, pull through both loops at once. You've completed one reverse single crochet. You can see the stitch has a unique twisted effect, different from the upright appearance of regular single crochet.
4Step 4
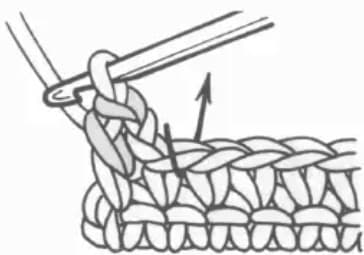
After completing one reverse single crochet, continue with the same method for the next stitch. Following the arrow direction, insert your hook into the adjacent stitch, repeating steps 2 and 3. Note that each stitch maintains the reverse insertion direction from right to left.
5Step 5
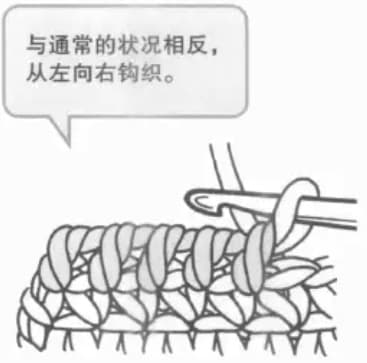
Repeat the above steps, continuing to work along the edge from left to right (for right-handed crocheters). When finished, you'll see the edge has a unique twisted texture-each stitch is slightly tilted, creating a braid-like decorative effect. This is the charm of reverse single crochet.
Tips
Keeping Edges Flat
Reverse single crochet may cause edges to contract slightly. If you need to keep edges flat, try using a slightly larger hook, or add a row of slip stitches before and after the reverse single crochet row as a transition.
Choosing Insert Position
Reverse single crochet can be worked into the top of stitches (like regular single crochet) or into the side of the edge. Different insertion positions create different effects. We recommend trying on a swatch first before working on your final project.
Combining with Other Border Stitches
Reverse single crochet can be combined with other border stitches for richer effects. For example: work a row of slip stitches first as a base, then reverse single crochet; or intersperse chain stitches between reverse single crochet rows for a looser edge effect.
Common Mistakes
I keep getting confused about the direction of reverse single crochet. What should I do?
Remember the "reverse" in reverse single crochet-opposite to regular single crochet. Regular single crochet goes right to left (for right-handed), so reverse single crochet goes left to right. Place a marker nearby while crocheting to remind yourself of the direction.
The edge becomes uneven after reverse single crochet. How do I fix this?
This may be due to inconsistent insertion positions or uneven tension. Solutions: ensure each stitch is inserted in the same position; maintain consistent tension for each stitch; you can also work a row of slip stitches first as a base, then add reverse single crochet.
My reverse single crochet looks the same as regular single crochet?
If reverse single crochet looks similar to regular single crochet, the insertion direction may be incorrect. Ensure your hook is truly inserted in reverse-for right-handed crocheters, you should be moving from left to right, completely opposite to regular single crochet.
Related Stitches
After mastering reverse single crochet, you can continue learning these stitches:
- : The foundation stitch for reverse single crochet
- : Another commonly used border stitch
- Lace Border Stitch: More complex edge decoration techniques
- Shell Stitch: Fan-shaped border decoration, pairs beautifully with reverse single crochet
Practice Suggestions
We recommend practicing reverse single crochet in these steps:
- First crochet a swatch about 20 stitches wide and 10 rows high in single crochet
- Try reverse single crochet along the top edge of the swatch
- The direction may feel awkward at first-be patient
- After completing a full row, observe the twisted effect
- Try reverse single crochet on other edges of your swatch
- Practice controlling tension for flat, attractive edges
Once comfortable, you can apply reverse single crochet to actual projects like blanket edges, coaster borders, scarf ends, and more, adding elegant decorative finishes to your work.
Reverse single crochet is a classic technique for edge decoration-simple to learn yet stunning in effect. Keep practicing to make your projects even more perfect!