
Introduction
Double Crochet Right Cross is a directional variation technique of the cross stitch. Compared to the standard cross stitch, the right cross is characterized by working the right-side double crochet first, then the left-side double crochet, creating a cross texture that slants toward the upper right.
In American terminology, this stitch is called Right Cross Double Crochet or Front Cross Double Crochet. In British terminology, it has the same name. It is an important variation in the cross stitch series, controlling the cross direction by changing the working order.
The characteristics of the right cross include:
- Clear Direction: The cross slants toward the upper right with a regular texture
- 3D Effect: The cross creates a relief-like three-dimensional texture
- Flexible Combinations: Can be alternated with left cross to create cable patterns
Tools You'll Need
Before practicing double crochet right cross, prepare the following:
- Crochet hook : A 3.5mm or 4.0mm hook is recommended
- Yarn : Choose medium-weight cotton or acrylic yarn
- Chain stitch foundation: You'll work on a foundation chain
- Double crochet basics: Please master the double crochet first
- Crossed Double Crochet basics: Learning standard cross stitch first is recommended
Prerequisites
Before learning right cross, it's recommended to master the standard double crochet cross stitch technique. Once you understand the cross principle, directional variations become easy to grasp.
Step-by-Step Instructions
1Step 1
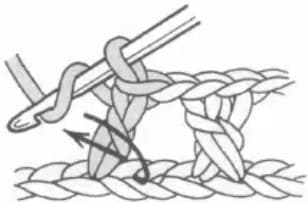
First work the double crochet that will be on the bottom of the cross section. Yarn over on your hook, then insert your hook into the chain on the right side following the arrow direction in the diagram. Note that you should pull through from the inside of the double crochet, then complete one double crochet. This step completes the double crochet at the right position, establishing the foundation for the cross.
2Step 2
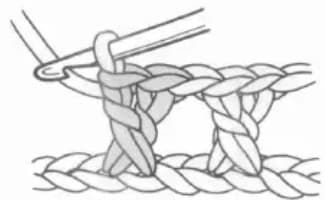
After completing the second double crochet, the right cross of one double crochet is complete. Note that both double crochets should be at the same height so the cross effect looks neat and beautiful. You can now see the cross texture slanting toward the upper right, which is the characteristic of the right cross.
Tips & Tricks
Understanding Cross Direction
The naming of right cross comes from the direction the cross line points. When viewed from the front, the cross line points toward the upper right. Remember the order "right first, then left" and you'll create the correct right cross effect.
Maintaining Consistent Height
Both double crochets must be at the same height, otherwise the cross will look uneven. Suggestions: check the height of both stitches after completing each cross group; maintain the same tension throughout; if you notice height inconsistency, adjust immediately.
Tension Control
Right cross also requires attention to tension. Don't work the first stitch (right side) too tightly, or the second stitch (left side) will be difficult to pass through. Maintain moderate tension so both stitches can be completed smoothly.
Common Mistakes
What if I did the cross direction backwards?
If the cross slants toward the upper left instead of upper right, you've worked in the wrong order. Solution: remember the phrase "right cross works right first"; work at the right position first, then return to the left position; when you notice the direction is wrong, undo and redo.
What if the two stitches have inconsistent height?
Height inconsistency is usually caused by uneven tension or inconsistent technique. Solution: maintain a steady working rhythm; use the same pull-through force for both stitches; during practice, you can count the number of loops in each step.
How do I locate the right-side stitch?
Difficulty locating stitches is a common issue for beginners. Solution: when facing your work, the right hand side is the "right side"; use stitch markers to mark the two stitches to be crossed; you can start practicing with simple two-stitch crosses.
Variations & Applications
Right cross can be combined with other stitches to create rich effects:
- Left Cross: Cross direction is opposite, slanting toward the upper left
- Alternating Cross: Alternating right cross and left cross creates regular waves
- Cable Patterns: Multiple cross groups combined create classic cable textures
- Cross + Chain Space: Combined with chain spaces creates openwork effects
Related Stitches
After mastering double crochet right cross, you can continue learning:
- : Standard cross stitch technique
- : The foundation stitch for cross stitch
- Double Crochet Left Cross: The opposite directional cross variation
- Cable Stitch: Patterns formed by multiple cross combinations
Practice Suggestions
Crocheters with some cross stitch foundation should practice in the following steps:
- First work about 20 chains as a foundation
- Work one row of regular double crochets in the first row
- Start trying right cross in the second row
- After becoming proficient, alternate with left cross
Double crochet right cross is an important variation in the cross stitch series. Mastering it allows you to create richer texture variations. Keep practicing and enjoy the fun of crocheting!