
Introduction
Shell stitch (shell) is a classic decorative stitch that gets its name from the fan shape formed by working multiple stitches into the same stitch, resembling a seashell. The shell stitch is also known as the fan stitch and is one of the most commonly used pattern foundations in crochet.
In American terminology, it's called Shell Stitch, and in British terminology, it's known by the same name. It's typically made by working multiple double crochets (or taller stitches) in the same position, creating an outward-spreading fan structure. The most common shell stitch combinations are "2 double crochets - 1 chain - 2 double crochets" or "5 double crochets."
The shell stitch is characterized by its graceful appearance and distinct layers, making it perfect for:
- Edging decorations: Adding delicate wavy effects to shawls, tablecloths, and garment edges
- Lacework: Creating airy, elegant lace patterns when combined with mesh stitches
- Yoke patterns: Forming radiating decorative effects in sweater yokes
- Blanket patterns: Creating regular wavy textures when repeated
Required Tools
Before practicing the shell stitch, you'll need to prepare the following:
- Crochet hook : A 3.5mm or 4.0mm hook is recommended for easier visibility of stitch structure
- Yarn : Choose medium-weight cotton or acrylic yarn in a bright color for easy identification
- Chain stitch foundation: Shell stitches are worked on a foundation chain
- Double crochet basics: Shell stitches are primarily made of double crochets, so master this first
Practice Preparation
Before practicing the shell stitch, crochet a foundation chain of about 20-25 stitches. The shell stitch requires some width to display its fan effect.
Step-by-Step Instructions
1Step 1
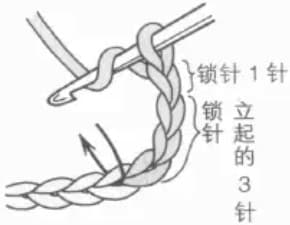
First, crochet 3 chain stitches as the turning chain (equivalent to the height of one double crochet), then crochet 1 more chain stitch as a spacer. Yarn over, insert the hook into the specified chain stitch as shown by the arrow, preparing to work the first double crochet. This is the starting position for a shell unit.
2Step 2
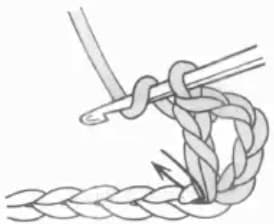
After completing the first double crochet, insert the hook again into the same chain stitch and work a second double crochet. Working multiple stitches into the same stitch is the core technique of the shell stitch-this allows multiple stitches to spread out from the same point, forming the starting point of the fan. You now have 2 double crochets, and the fan foundation is taking shape.
3Step 3
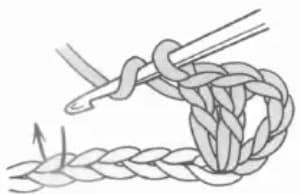
Yarn over, skip 4 chain stitches (these 4 stitches form the "opening" of the shell), then insert the hook into the 5th stitch. In this new position, work 2 double crochets, then crochet 1 chain stitch as the shell's center anchor point. This step creates the other half of the shell; the 4 skipped stitches form the spacing between shells.
4Step 4
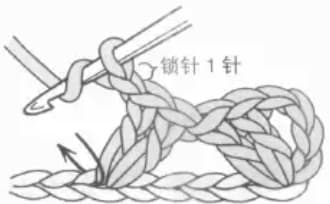
Following the arrow direction, insert the hook into the same position where you just crocheted the chain stitch (below the chain), and continue to work 2 double crochets. At this point, a complete shell unit is formed: 2 double crochets on the left + chain stitch in the middle + 2 double crochets on the right, spreading out in a fan shape, resembling the outline of a shell.
5Step 5
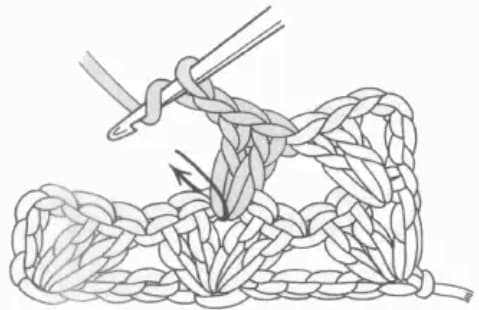
When crocheting the next row, you need to pick up the stitches from the previous row's shell as a group. Pick up stitches at the top of the shell (at the fan's arc) as the starting point for the new row. Then repeat the "2 double crochets, 1 chain stitch, 2 double crochets" combination, forming new shells in the gaps between the previous row's shells. This way, shells in upper and lower rows will be staggered, creating a beautiful wave effect.
Tips
Keep Shell Shapes Even
The beauty of shell stitches depends on whether each shell is the same size. When crocheting, note: keep the same number of stitches in each shell (such as all being 5 double crochets or "2-chain-2" combinations); the spacing between shells should be consistent; double crochet heights should be even, which can be achieved by maintaining the same yarn over and pull-through tension.
Choose Appropriate Spacing
The spacing between shells determines the final effect. Large spacing (skipping 3-4 stitches) creates obvious gaps between shells, suitable for lace effects; small spacing (skipping 1-2 stitches) makes shells closely connected, forming fuller edging. Choose appropriate spacing according to your project needs.
Counting and Positioning
The areas where shell stitches are prone to errors are skip counts and insertion positions. It's recommended to use stitch markers to mark the center of each shell, checking the count after completing each shell. When starting a new row, first confirm the position of the previous row's shells, then determine the insertion point for new shells.
Common Mistakes
What if the shell shape is asymmetrical, with one side higher than the other?
Shell asymmetry is usually caused by inconsistent heights of multiple double crochets worked in the same position. Solution: Ensure each yarn over creates the same size loop; maintain the same tension when pulling through; after completing a shell, check if all stitches are at the same height. If you find a problem, it's easier to unravel and redo than to continue with errors.
What if the spacing between shells is uneven?
Uneven spacing is usually caused by inconsistent skip counts. Solution: Use stitch markers to mark the end position of each gap; after completing each shell, check the starting position of the next shell; if the foundation chain has many stitches, count every few stitches to confirm. Keeping spacing even is key to beautiful shell stitches.
What if the next row can't align with the previous row's shells?
Misaligned upper and lower row shells are caused by not correctly finding the insertion position. The next row's shells should be worked in the gaps between the previous row's shells, not directly above the shells. Solution: After turning your work, first observe the previous row's structure; find the "valley" position between shells; start crocheting new shells at the valley. This creates a beautiful staggered arrangement of shells.
Variations and Applications
The shell stitch has many variations you can choose from:
- 5 Double Crochet Shell: Working 5 double crochets continuously into the same stitch, the most basic shell form
- 7 Double Crochet Shell: A larger fan shape, suitable for fuller edging effects
- Treble Crochet Shell: Using treble crochets instead of double crochets for taller, longer shells
- Mesh Shell Combination: Alternating shell stitches with chain mesh, creating lace effects
- 3D Shell: Adding puff stitches or popcorn stitches to the shell center for added dimension
Related Stitches
After mastering the shell stitch, you can continue learning:
- : The foundation stitch for shell stitch
- : Connection and spacing between shells
- Puff Stitch: Another decorative stitch working multiple stitches in the same position
- Popcorn Stitch: Gathering multiple stitches in the same position to create 3D effects
Practice Suggestions
Beginners are advised to practice shell stitches following these steps:
- First crochet about 25 chain stitches as a foundation
- Work one row of shell stitches on the chain, with 4 stitches between each shell
- Turn the work and crochet a second row of shell stitches, paying attention to staggering with the first row
- Repeat practicing multiple rows until shell shapes are even and spacing is consistent
After completing practice, you can try simple projects: lace coasters, decorative edges, or simple shell motifs. These projects help reinforce shell stitch techniques while experiencing the sense of accomplishment that decorative stitches bring.
The shell stitch is one of the most elegant decorative techniques in crochet. Mastering it allows you to add delicate edging effects to various projects. Keep practicing and enjoy the joy of creation!