
Introduction
Pine Stitch is a special decorative stitch that creates a lacy, flowing effect. By combining multiple double crochets worked between single crochets, it forms fluffy, dimensional fan patterns. This stitch is commonly found in edging, lace trim, and projects that need a soft, romantic appearance.
The name "pine stitch" comes from its appearance: multiple double crochets clustered together resemble the fluffy, spreading needles of a pine tree. This stitch typically follows a "1 single crochet + 5 double crochets" repeating pattern, with the next row secured by "single crochet in center of double crochets," creating a stable fan structure.
Pine stitch is perfect for:
- Shawl and scarf edging
- Lace trim and decorative bands
- Skirt hems and cuffs for children's clothing
- Projects requiring a romantic, feminine style
Materials Needed
Before practicing pine stitch, prepare the following tools:
- Crochet hook : Recommended 3.5mm-4.0mm hook
- Yarn : Choose medium-weight cotton or blended yarn; light colors make it easier to see stitch structure
- Chain stitch foundation: Work one row of chain stitches as practice foundation, with a count divisible by 4 plus 1
Starting Chain Recommendation
When practicing pine stitch, the starting chain count should be 4n+1 (such as 17, 21, or 25 chains). This allows you to complete full pattern repeats. The first row's single crochet needs to skip 3 stitches and work into the 4th, so you need enough stitches to show a complete pattern.
Step-by-Step Instructions
1Step 1
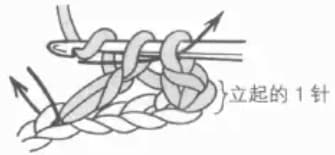
First work 1 single crochet into the foundation chain. Then insert your hook into the 4th stitch (skipping the stitches in between), and work 5 double crochets consecutively. These 5 double crochets will all be worked into the same stitch, forming the base of a fan shape. Note: The number of skipped stitches and double crochets can be adjusted based on pattern design. Common variations include "skip 3, work 5" or "skip 2, work 3".
2Step 2
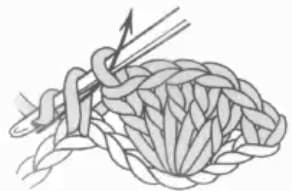
After completing 5 double crochets, skip 3 stitches and work 1 single crochet into the 4th stitch. This single crochet serves to secure and separate, dividing two groups of double crochet fans. You have now completed one full pine stitch pattern unit: 1 single crochet + skip 3 + 5 double crochets + skip 3 + 1 single crochet. Repeat this pattern to the end of the row.
3Step 3
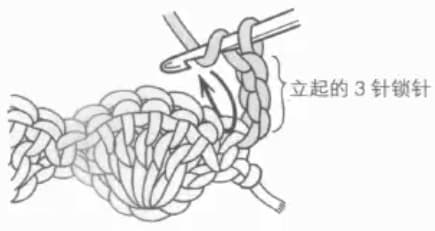
Turn your work and begin the next row. First chain 3 as a turning chain (equivalent to the height of 1 double crochet), then insert your hook into the single crochet from the previous row as shown by the arrow, and work 2 double crochets. These 3 stitches (1 turning chain + 2 double crochets) will serve as the starting point for the new row's pine stitch structure.
4Step 4
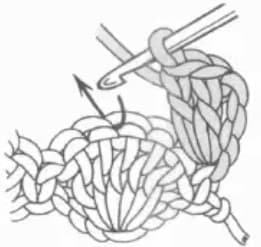
Following the arrow, insert your hook into the center position of the 5 double crochets from the previous row (the 3rd double crochet's stitch), and work 1 single crochet. This single crochet will secure the fan structure from the previous row while also serving as an anchor point for the next fan group. Make sure the single crochet is inserted in the correct position so the pattern stays neat.
5Step 5
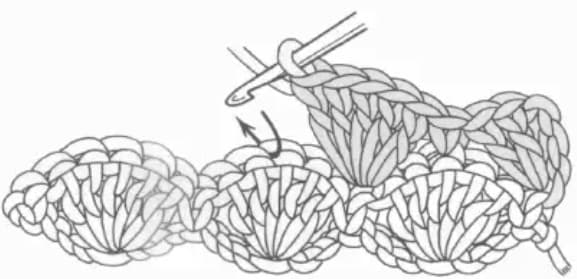
Continue with the same technique: work 5 double crochets into the single crochet from the previous row, then work 1 single crochet in the center of the double crochets. Repeat this pattern to the end of the row, then continue with the next row following steps 3-5. Through multiple rows of repetition, you will see the fluffy fan pattern characteristic of pine stitch gradually emerge.
Tips
Maintain Even Stitches
When working 5 double crochets, pay attention to keeping each stitch consistent in tension. If the double crochets are too tight, the fan will curl; if too loose, the pattern will become floppy and misshapen. It's recommended to pause briefly after each double crochet to confirm proper tension before continuing.
Single Crochet Placement
The single crochet in the second row needs to be inserted accurately into the center position of the 5 double crochets from the previous row. If the position is off, the pattern will be asymmetrical. You can gently press the double crochets with your finger to find the center stitch before inserting.
Pattern Variations
Pine stitch can be adjusted by changing the number of skipped stitches and double crochets. Common variations include:
- "Skip 2, work 3": More compact small fans
- "Skip 3, work 5": Standard pine stitch pattern
- "Skip 4, work 7": Larger, fluffier fans Choose the appropriate variation based on your project's style.
Edge Finishing
Pine stitch is often used for project edges. The final row can be left with fans spread open, without needing a securing row. This creates a natural wavy effect at the edge, adding beauty to your work.
Common Mistakes
My double crochet count is inconsistent. What should I do?
Each fan should have the same number of double crochets (usually 5). If the count varies, the pattern will appear uneven. Solution: Count the double crochets silently as you work, pausing to confirm after each group; you can also place markers between double crochets to help count.
My pattern is distorted or twisted. What's causing this?
Pattern distortion usually comes from incorrect skip counts or inaccurate single crochet placement. Solution: Ensure you skip the same number of stitches each time; check that single crochets are inserted in the correct position (directly in the center of the double crochet fan); maintain steady hand position and avoid pulling on completed stitches.
The edges of my work are uneven. How do I fix this?
Pine stitch projects naturally have wavy edges. If you want straighter edges, you can finish the final row with single crochets or slip stitches. When edging, maintain even tension-don't pull too tight and affect the fluffiness of the fans.
How do I calculate the starting chain count?
Pine stitch pattern repeats in fixed stitch count units. The "skip 3, work 5" pattern needs 8 stitches per unit (1 single crochet + 3 skipped + 5 double crochets - single crochet placeholder + single crochet insertion point). Recommended starting chain count is a multiple of 8 plus 1 starting single crochet. For example: 17 chains will give you 2 complete pattern units.
Related Stitches
After mastering pine stitch, you can try these related stitches:
- Shell Stitch: Similar fan effect, but with slightly different stitch combination
- Fan Stitch: Multiple double crochets clustered in the same stitch, forming a shell shape
- Puff Stitch: Multiple incomplete double crochets joined together, creating a dimensional puff effect
- V-Stitch: Double crochets combined with chain stitches to form V-shaped patterns
All these stitches use the principle of clustering double crochets to form patterns. Once you master pine stitch, learning other decorative stitch patterns becomes easier.
Practice Suggestions
Follow these steps to practice pine stitch:
- First master the basic techniques of Single crochet and Double crochet
- Chain 21 stitches (this gives you 2 complete pattern units)
- Follow steps 1-2 to work the first row of pine stitch
- Turn your work, follow steps 3-5 to work the second row
- Repeat practice until the pattern is neat and stitches are even
After completing basic practice, try simple projects using pine stitch, such as decorative trim, coasters, or small shawls. These projects showcase the flowing effect of pine stitch while reinforcing your skills.
Pine stitch is a classic decorative stitch. Once you master it, you can add soft, romantic decorative effects to your projects. Keep practicing and enjoy the joy of creating!