
Introduction
Double Crochet Front Post is a special crochet technique where you work around a double crochet post from the front of the fabric, creating raised 3D relief texture effects. This stitch is commonly used for relief patterns, cables, textured designs, and decorative motifs, adding unique dimensional visual interest to your projects.
The difference between double crochet front post and regular double crochet lies in the insertion method: regular double crochet is worked vertically from the top into the stitch, while front post crochet works horizontally around the "post" of the stitch, "hugging" it from the side. This special insertion method causes the front post stitch to protrude outward, creating a pronounced 3D relief effect that is more prominent than single crochet front post stitches.
In crochet diagrams, double crochet front post is typically represented by a symbol with a long vertical line and an arrow indicating the insertion direction. Once you master double crochet front post, you can create various beautiful textured patterns such as raised diamonds, relief motifs, and cable textures.
Required Tools
Before practicing double crochet front post, prepare the following tools:
- Crochet hook : A 3.5mm or 4.0mm hook is recommended for easier yarn manipulation around the post
- Yarn : Choose medium-weight cotton or acrylic yarn in a bright color to easily see your stitches
- foundation: Front post stitches are worked on completed double crochet rows, so master basic double crochet first
Practice Preparation
Before practicing double crochet front post, crochet several rows of double crochet as a foundation. Double crochet is taller than single crochet, giving more space to work around the post, but pay attention to maintaining proper hook angle and tension to avoid too tight or too loose loops.
Step-by-Step Instructions
1Step 1
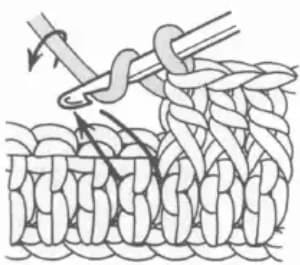
On a completed row of double crochet, locate where you want to work the front post stitch. Insert the hook from the front, horizontally around the double crochet post, going from right to left of the post, "hugging" the entire double crochet (not including the top V and bottom loop). Then yarn over, ready to pull through.
2Step 2
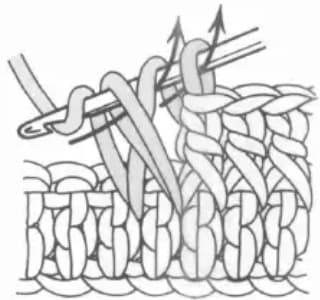
After yarning over, pull the hook with the yarn through. You now have two loops on the hook. Yarn over again, pull through the two loops closest to the hook head (first pull through); yarn over again, pull through the remaining two loops (second pull through). This completes a double crochet front post, using the same two-step pull through as a regular double crochet.
3Step 3
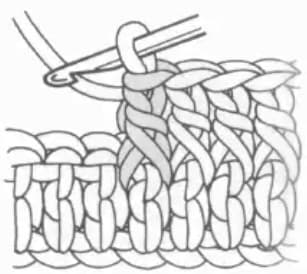
After completing the double crochet front post, you'll notice this stitch protrudes outward, noticeably higher than surrounding regular double crochet stitches. Since double crochet is taller than single crochet, the front post double crochet creates a more pronounced raised effect with stronger dimensionality, perfect for large relief patterns and bold textured designs.
Tips
Positioning Your Hook
Double crochet front post wraps around the "body" of the double crochet, the vertical section between the two yarn over points. Insert from the right side of the double crochet and exit from the left, ensuring the hook completely wraps around the entire post. Don't wrap around the top V, as this would change the stitch structure.
Maintaining Even Tension
Double crochet front post requires more yarn than single crochet front post since you're wrapping around a taller post. Maintain moderate tension when wrapping - loops need to be large enough to complete the pull through, but not too loose. Consider leaving a bit more yarn length before wrapping.
Combining with Regular Double Crochet
Double crochet front post is typically combined with regular double crochet to create alternating high-low relief effects. Common patterns include: working front post every few stitches (creating raised vertical ridges), consecutive front post stitches (forming raised block patterns), alternating with back post stitches (creating wave textures or cable effects).
Row Counting
When working relief patterns, front post stitches are typically worked on right-side rows. If the pattern spans multiple rows, work front post stitches only on odd-numbered rows (right side), using regular double crochet on even-numbered rows (wrong side). This keeps the raised effect facing the front, creating clear relief patterns.
Common Mistakes
Can't complete the double crochet front post, yarn keeps slipping off. What should I do?
This is usually caused by wrapping too tightly or incorrect hook angle. Solution: Leave more yarn when wrapping, loops should be slightly larger than regular double crochet; after inserting the hook from the right side of the post, lift the hook slightly upward before exiting from the left; ensure double crochet in previous rows aren't too tight. Practice a few times to find the right loop size and hook angle.
Front post stitches have inconsistent height, some tall some short. How to fix?
Inconsistent height is usually caused by uneven tension during pull throughs. Solution: Maintain the same tension for each pull through, don't pull too tightly; ensure both pull throughs completely go through the loops; try counting rhythm to control tension. Also check if yarn thickness is consistent, as yarn irregularities can cause height differences.
The edges deform or curl after working front post stitches. What to do?
Edge deformation may be caused by density changes or uneven tension in the front post area. Solution: Work regular double crochet stitches next to front post stitches slightly looser to balance overall density; keep several regular double crochet stitches on each side as a border; add stabilizing rows at the edges to maintain shape.
The raised effect of double crochet front post isn't obvious. What's wrong?
The raised effect may not be obvious for several reasons: wrapping only part of the double crochet post instead of the entire post; pulling through too tightly compressing the loops; yarn too thin or hook too large. Solution: Ensure the hook completely wraps around the double crochet body; relax pull through tension to give front post stitches "standing" room; try using thicker yarn or a slightly smaller hook.
Related Stitches
After mastering double crochet front post, continue learning these related stitches:
- : The foundation stitch for front post work
- Double Crochet Back Post: Working around the post from the back, creating a recessed effect - combine with front post for rich textures
- Front Post: Using single crochet for front post work, lower but denser raised effect
- Half Double Crochet Front Post: Dimensional effect between single and double crochet
- Puff Stitch: Multi-stitch cluster creating 3D flower shapes, using similar wrapping principle
Practice Suggestions
Follow these steps to practice double crochet front post:
- First crochet 5-6 rows of regular double crochet as foundation
- Try working front post stitches in the middle stitches, feeling the raised effect
- Practice working front post every other stitch, creating ridged texture
- Try crocheting simple relief patterns like diamonds or blocks
After completing basic practice, try crocheting some dimensional pattern projects like relief motif pillows, cable texture scarves, or raised pattern blankets. These projects help reinforce double crochet front post skills while experiencing the joy of relief crochet.
Double crochet front post is an important technique in crochet for creating relief effects. Mastering it will add dimensional layers and artistic beauty to your projects. Keep practicing and explore more exciting relief pattern combinations!