
Introduction
Single Crochet 3 in 1 is a commonly used increase technique, also known as single crochet increase 2. This technique works 3 single crochet stitches consecutively in the same stitch, turning the original 1 stitch into 3 stitches, achieving an increase of 2 stitches.
Increasing is an important method for shaping crochet work. By adding stitches at specific positions, you can expand, raise, or form specific shapes in your work. Single crochet 3 in 1 is one of the most commonly used increase methods, widely applied in circular projects (such as coasters, hats), amigurumi making, and projects that need expanding edges.
The symbol for this technique usually shows a single crochet symbol with 3 diagonal lines pointing to the same stitch, indicating working 3 single crochet stitches in the same stitch. In patterns, you will see arrows pointing to the same insertion point, which is key to identifying the increase position.
Tools Needed
Before practicing single crochet 3 in 1, you need to prepare:
- Crochet Hook: Recommended 3.0mm or 3.5mm hook
- Yarn: Medium weight cotton or wool yarn
- Scissors: For cutting yarn
- Stitch Markers (optional): For marking increase positions
Practice Tip
Beginners are advised to practice with contrasting color yarn first, so you can more clearly see the 3 single crochet stitches in the same stitch. Apply it to actual projects after becoming proficient.
Step-by-Step Instructions
1Step 1
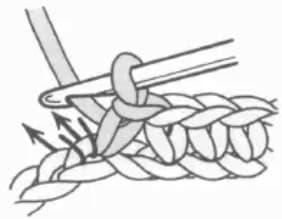
First complete the 1st single crochet, then as shown by the arrow, insert the hook into the same chain stitch (stitch) again and begin working the second single crochet. Note that the insertion point is exactly the same as the first stitch.
2Step 2
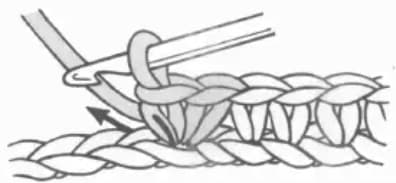
As shown by the arrow, insert the hook into the same chain stitch again and work the third single crochet. All three insertion points are identical, which is the key to completing the increase.
3Step 3
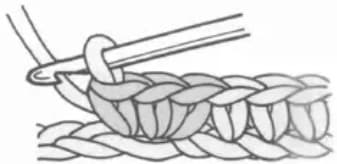
The completed effect is shown in the image. After working 3 single crochet stitches in one stitch, the position that originally had 1 stitch now has 3 stitches, achieving an increase of 2 stitches. You can see the 3 single crochet stitches arranged in a fan shape.
Tips
Maintain Even Tension
When working 3 consecutive stitches in the same stitch, the stitch can become quite tight. It's recommended to slightly loosen the yarn with each stitch to avoid the stitch being too tight for subsequent work. If it feels too tight, try using a slightly larger hook.
Distribute the Fan Shape Evenly
After completing the 3 single crochet stitches, they will form a fan shape. Pay attention to distributing the 3 stitches evenly, avoiding bunching together or uneven spreading. You can gently adjust the position of each stitch with your fingers to make the overall appearance more beautiful.
Count to Confirm
After completing the increase, it's recommended to stop and count the stitches. Make sure you have actually worked 3 stitches in the same stitch, not 2 or 4 stitches. This is very important for maintaining accurate project shape.
Common Mistakes
What if my insertion point keeps drifting?
When inserting into the same stitch repeatedly, beginners tend to drift from the correct position. Solution: Use your thumb and index finger to hold the stitch in place, confirming the position before each insertion. You can also use a stitch marker to mark this stitch to remind yourself of the insertion point.
What if the 3 single crochet stitches bunch together and look unattractive?
If the 3 stitches bunch together, it may be because you're pulling the yarn too tight with each stitch. Solution: After completing each stitch, slightly loosen the yarn to leave space for the next stitch. Also pay attention to maintaining even tension while crocheting.
What if I forget how many stitches I've worked?
It's easy to lose track when working multiple stitches in the same stitch. Solution: Count silently "one, two, three" while crocheting. You can also observe the number of loops on top of the stitch after completing each one to ensure accurate counting.
Applications
Single crochet 3 in 1 is commonly used in the following situations:
- Circular Projects: Such as coasters, hats, amigurumi heads, expanding the work in a circular pattern through even increases
- Petal Shapes: Increasing at the starting point of petals to make them fuller
- Edge Decorations: Creating wavy or fan-shaped effects on edges
- Amigurumi Making: Shaping specific parts like arms, ears, etc.
Related Stitches
After mastering single crochet 3 in 1, you can continue learning these related stitches:
- : The foundation stitch for this technique
- : Working 2 single crochet stitches in the same stitch, adding 1 stitch
Practice Suggestions
Beginners are recommended to practice following these steps:
- First practice on a foundation chain, doing single crochet 3 in 1 every few stitches
- Observe the effect after increasing, noting the fan shape
- Try practicing increases over multiple rows, feeling how the project shape changes
- Practice with patterns to familiarize yourself with the correspondence between symbols and actual operations
Single crochet 3 in 1 is an important technique for shaping crochet projects. Master it and you'll be able to create more diverse projects!